
Mark Rippetoe is the author of the Starting Strength method. This strength training method is the most succesfull way to increase your strength levels, and it’s suitable for all audiences: children, adults, and seniors; men and women; and those with fitness goals or those looking to improve athletic performance. It’s important to mention that for performance athletes, this is probably the best method for improving basic strength levels during their general physical conditioning period and during their off-season.
The basic lifts that are part of the Starting Strength model are five: the squat, the deadlift, the press, the bench press and the power clean. In the first part of this article, you have learned the technical execution of the first four lifts. Now it´s the time for learning how to execute the power clean.
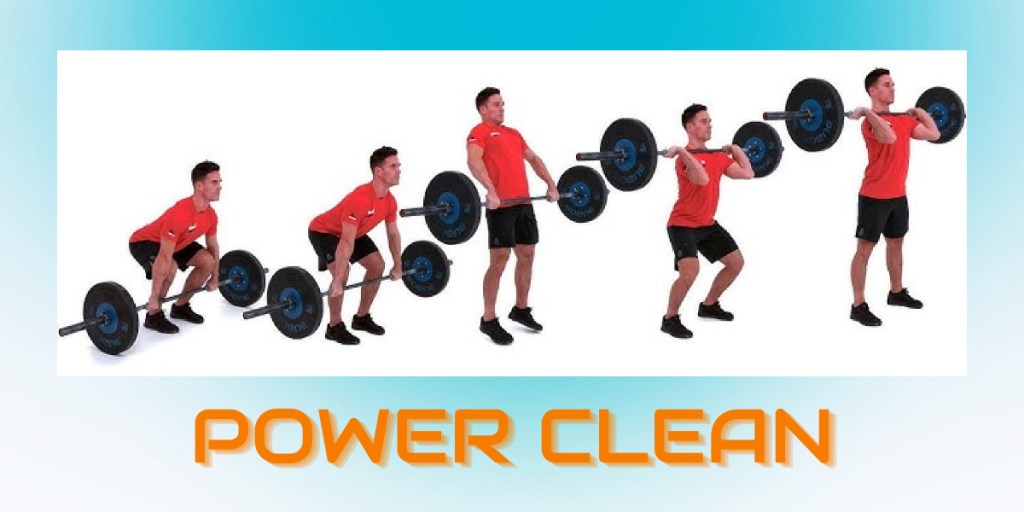
LEARNING TO POWER CLEAN
Learning the Three Positions
We’re going to detail the major steps involved in learning and coaching the power clean. The power clean is quite underutilized in most people’s training but for most people the power clean must be coached. It’s not as straight forward as the bench press, the press or the deadlift. It must be coached. So we’re going to break down the steps Mark Rippetoe uses to coach the power clean. You can read this information several times, memorize it, and hopefully this will help clear this up so that the power clean will become more accessible to you. We don’t want you to be afraid of it. We want you to use it.
First we’re going to go over the initial positions that we use to teach the power clean. You are going to come to the bar and then deadlift the bar up to the top. This is called the hanging position. We’re going to memorize three different positions. Notice that the hang position is the same stance as the deadlift: toes are slightly out, heels are narrow, chest is up, arms are straight, and elbows are straight. Keep this in mind. The difference between this and the top of the deadlift is that the grip is a little bit wider on the power clean because the grip in the power clean facilitates the rack position on the shoulders.
- In a deadlift the grip is narrow because we’re trying to reduce the range of motion of the pull.
- In a power clean the range of motion of the pull is fixed by the height of the shoulders.
So we widen the grip a little bit to facilitate this next position, which is called the rack position. Get the bar up on your shoulders. Your elbows should be up. Notice that the bar is laying on top of the meat of the deltoid and that the elbow facilitates this shoulder flexion position. The shoulder flexion raises the belly of the deltoid up and it presents a racking spot for the bar. It will not be in contact with the clavicles and it will not be in contact with the throat. It lays on the delts. This is the rack position, in which the clean ultimately goes.
Now drop the bar straight down. This is where we start to learn that the bar path in a clean is a vertical line. That’s our model of the bar path. In reality it’s not a vertical line but I want you to think about it as a vertical line. You’re back to the hang position.
The third position we’re going to learnt is called the jumping position. As you might expect, this is going to look from the side like the bottom of a standing vertical jump. Knees and hips are going to be in flexion. This places the bar somewhere in the middle of the thigh, that will depend on your arm length and your anthropometry, but somewhere between the knee and the hip. The bar will be in contact with the quads. This point of contact is thought of now as the jumping position. We’re going to jump from this position and start the process of actually cleaning the bar.
Jumping with Straight Arms
You´re going to pick the bar up off the ground into the hang position and unlock knees and hips. This places the bar on the thigh in a recognizable place that you will define. That’s the jumping position. The contact point on the thigh after you unlock the knees and hips becomes the jumping position. In other words, the jumping position is the position of the bar against the thighs.
As you might guess from the name, this jumping position is going to be the position from which we jump up in the air to initiate the rack with straight elbows. Straight elbows are the key. This is the time to start learning that the clean is always performed with straight elbows. When you jump up in the air you are transmitting the force of knee and hip extension to the platform. Between the platform and the bar you are applying force to the load. That load must experience the full measure of the force you can produce with your knees and hips. That means that the elbows must be straight because if they are bent, they can be straightened out and if they can be straightened out then some of the force that you are going to try to get down to the bar will be absorbed in straightening out the elbow. So we’re going to eliminate that loss of power transfer by learning right now to clean with straight elbows and what we’re going to do is jump.
Jump straight up into the air with straight elbows. Do it again from the jumping position, that place on your thighs that you’ve identified. Jump up in the air as high as you can jump. Note that the jump goes up in the air with straight elbows.
If you find that you’ve got an elbow bend at this point in the process there’s a couple of reasons why that might be.
- First thing is you’re not aware of the fact that your elbow is straight or bent. If you think about the elbow position, just put your brain right there on this piece of the skin and pay attention to what your elbows do. Making a little bit of pronation or internal rotation serves as a good reminder to keep the elbow straight.
- Second, if you are having problems keeping the elbow straight in this position, it could very well be that this is the reason: as you come down into the bottom, you’re pinning the bar to the thighs and let instead of letting it slide up and down free. If you let it slide it up and down freely with straight elbows, they won’t bend here to begin with. This is the source of a lot of this stuff during the teaching positions for an elbow bend.
- Third, if this becomes a terribly big problem, assume the triceps pose, real tight like Mr. Olympia, fat triceps on the back. This is tight that cannot bend.
We’re going to talk more about the mechanics of keeping the elbow straight and why it is so very important. But right now, practice jumping from the jumping position straight up with straight elbows.
Racking the Bar
Now we’re gonna jump and catch the bar. This is the actual part of the clean where you rack the bar on your shoulders. You already know that the jumping position is where the bar is in contact with the skin of the middle of the thighs with straight elbows. Now we’re going to jump with straight elbows and we can verify that the elbows are remaining straight through the jump. Then we’re going to do the rack position. The rack position is the part that gets the bar on the shoulder.
You´re going to deadlift the bar up to the hang position. Your grip is wider than the deadlift. Make sure you have enough room to let your elbows rack the bar at the top. This will require a little bit wider grip than the deadlift. You are standing tall in the hang position and now move to the jumping position. Elbows are straight. Everyone of you verify at this point that elbows are straight. A bent elbow is a power leak. Unlearn it now. Elbows are straight. Jump straight up in the air maintaining straight elbows the entire time. Use your triceps whatever you need to do. Most importantly, do not unlock the elbow as you slide the bar down into the jumping position. This is where a lot of that happens.
Once you verify that you are keeping elbows straight during this phase of the movement pattern, you are going to jump up in the air and at the top of the jump you are going to verify elbows are still straight. Then as you come back down the elbows go forward. Every correct power clean must go through this position, where the elbows are straight, the hips and the knees are extended and the momentum has carried you up onto your toes. After that and only after that position to the elbows bent and the elbows go forward. Elbows in a clean are never up. Get that out of your brain. Elbows are straight and they’ll go forward.
Think of it like this. It’s a jump and then a catch. The jump is with straight elbows and the catch is with elbows forward. Jump, then catch. That’s the correct sequence. Notice that correctly perform, the top of the jump features straight elbows and that the elbows go forward only on the way back down. Note that you do not unlock the elbows sliding down right there into the jumping. Done correctly this is an efficient transmission of power to the floor. Read this several times. Try to absorb all the information and put it into your clean practice.
Reinforcing the Jump Position
We talked about before racking the bar: jumping with straight arms, catching bar in the rack position. And that’s basically the clean. Now we’re going to show you the steps that take the clean back down to the floor to make a full power clean from the floor out of it.
STEP 1 – Come to the bar and deadlift it back up into the angle where everything starts from the hanging position. Slide the bar with straight elbows down to the jumping position, that place on the thigh at the bar must touch. The jump precedes from the mid thigh which is the jumping position. Jump and catch. Verify that the elbows are straight.
STEP 2 – From the hanging position and getting to the floor, slide the bar with straight elbows to a point just below the patellas. It’s about halfway down. From this position you are slowly going to pull the bar up to the jumping position, and jump and catch. Every clean must come off the thigh at the jumping position. It must be in contact with the thigh at the jumping position. Don’t go fast right now. Acceleration is for later. We are learning the jumping position. We’re learning to touch the bar to the thigh every time we clean and jump up in the air with straight elbows. Don’t unlock the elbows on the way down and don’t unlock the elbows on the way up. You go all the way up into the top of the jump and then bend the elbows to come back down.
STEP 3 – Catch the bar to the hanging position. Slide the bar with straight elbows just below, the bottom half of your shin. This is a position where everybody will be at a point where the barbell loaded with plates will be against the shin. This is the bottom of the pull and it’ll be just below the bottom half of the shin. This should look like a deadlift. Again, you’ll pull slowly until you reach the jumping position, and then jump and catch it. Don’t pause at the jumping position. The jumping position right now is like a trigger, sticking out of your thigh, that the minute it’s contacted you jump. You touch the trigger and you jump up in the air. The bottom position should look like a deadlift. We learned how to deadlift already. The bottom position is a pull off the floor and every pull off the floor looks the same. If you do this correctly, there will be no slop, no wasted motion, and no loss of power. Elbows are straight at the top of the pull. Jump, then catch.
Adding Plates and Tying All Together
Now, we are going to take all the previous steps and put them all together into a little five-step process that ultimately culminates in a complete correct power clean. But if at any point during this process you have started to unlock your elbows, go back to the previous place where you’ve jumped up in the air with straight elbows. Jump up in the air with straight elbows and make sure your elbows are staying straight. This is the time to fix an arm pull. It must be done now. You must learn to jump up with straight elbows and then come down with elbows going forward to rack the bar. So if you detect an arm pull, don’t hesitate. Back up, jump up with straight elbows, then rank.
STEP 1 – What we’re going to do is to come to the bar. Deadlift the bar up to the hang position, where everything starts. From the hang position you come down to the jumping position. You will jump, then catch. You catch the bar at the rack position.
STEP 2 – Catch the bar at the hang position. Now like we saw in the previous section, you´re going to lower the bar to just below the knees. Slowly you pull it up to the jumping position, and jump and catch. The jumping position is a trigger on the thigh that causes you to jump without a pull.
STEP 3 – Now you´re gonna reach down and touch the plates to the floor, which will be the same position at the low shin that you were before. Go to up slowly. Jump and catch it. And that’s a full clean. Get you that the hang and set the bar on the floor.
STEP 4 – Come to the bar. Set up correct deadlift with a clean grip. Slowly you come off the floor, and you jump and catch.
STEP 5 – Repeat the previous step one again with straight elbows. Chest up. Jump, then catch. This is the power clean.
To recap, these are the five steps:
- Hang position, jump and catch.
- Below the knees, jump and catch.
- Touch the plates to the floor for a full range of motion pull, jump and catch.
- Set it down on the ground. Set up a correct pull from the floor, jump and catch.
- Do it again, jump and catch. Verifying every single time that the elbows stays straight. This ties the whole procedure together.
The Details: Diagnostic Angles and the Shrug
You are going to come over and do a series of cleans off the floor while you record yourself on video. Once finished, I want you to notice a couple of things. I want you to notice the angles that you occupy off the floor. As you come up into the pull position, you take all the slack out of the back. The back is in extension. Notice the angle of your arm and notice the angle of your shin, indicating a correct pull from the floor. Your final setup position looks exactly like a deadlift. Notice your shoulders at the top of the pull. Notice what you do with your shoulders, not the movement you´re making at the top of the pull with your shoulders.
Everyone of the cleans that you noticed in your video recordings, if you look very carefully, you’ll notice that you shrugged your shoulders at the top of every pull starting from when you jumped up in the air with the bar with no plates on it. The shrug is a concentric trapezius contraction. It is a reflex action. It’s completely involuntary. Everybody that ever performed a clean or a snatch performed a shrug. This is inherent in jumping with the bar in your hands and since it´s inherent, we haven’t even mentioned it before. The fewer number of steps you have to think about, the more likely you are to be able to think about them quickly in sequence and execute them correctly because the more steps, the more complexity. We’re trying to simplify this and since you’re going to shrug anyway, you don’t need to think about it while you’re learning it. But the shrug can be a very useful cue to help you learn to finish the pull.
Do a power clean while you record yourself again. Now I’m going to tell you to make sure and finish a shrug, a big tall shrug with straight elbows. Watching you in the recording, you’ll notice that when you think about the shrug. The last 2 or 3% of the pull is accentuated as you finish everything with nice straight elbows and the shrug becomes a very useful addition to the clean instruction.
I hope this helped. I hope that this article has helped you learn how to clean better and feel more confident about coaching it to your athletes.
Bibliographic references:
- Rippetoe M. (2011). Starting Strength: Basic Barbell Training, 3rd Edition. The Aasgaard Company.
- Starting Strength. (2020). Power Clean Series Part 1 – Learning the Three Positions [Video file]. YouTube. https://youtu.be/37-wjE_c4NU?si=es4VDaVMSY1u65ew
- Starting Strength. (2020). Power Clean Series Part 2 – Jumping with Straight Arms [Video file]. YouTube. https://youtu.be/tshIHqR_3yM?si=jpzE7Pu13WDPaG7h
- Starting Strength. (2020). Power Clean Series Part 3 – Racking the Bar [Video file]. YouTube. https://youtu.be/EyAMgwOM2yQ?si=SnIsIgSN8pBeZxwT
- Starting Strength. (2020). Power Clean Series Part 4 – Reinforcing the Jump Position [Video file]. YouTube. https://youtu.be/W638nZTemBc?si=CPuX4wtam8vbJsft
- Starting Strength. (2020). Power Clean Series Part 5 – Adding Plates and Tying it All Together [Video file]. YouTube. https://youtu.be/QtkLw9AOMeI?si=KUoV8n4Vk5f9QqmB
- Starting Strength. (2020). Power Clean Series Part 6 – The Details: Diagnostic Angles and The Shrug [Video file]. YouTube. https://youtu.be/xmKTiqE3S0E?si=ZZac1Etm2brM2v_F

Leave a comment