
In this post you´ll learn how trainees who have shoulder limitations can modify the press by sliding it along the front of the rack. The starting height, distance from the rack, and finish position are adjusted for each person, keeping the movement as close as possible to the press. This information provides from Wichita Falls Athletic Club coach Carmen Phillips.
Today, today we’re going to talk about pressing against the rack. Coach Carmen Phillips has lot of clients that have to press against the rack because their shoulders are messed up from injuries, surgeries, just arthritis and such. She has to do the same thing because she has shoulder injuries also. But a lot of her clients are also her age and older and that’s this is just kind of what happens.
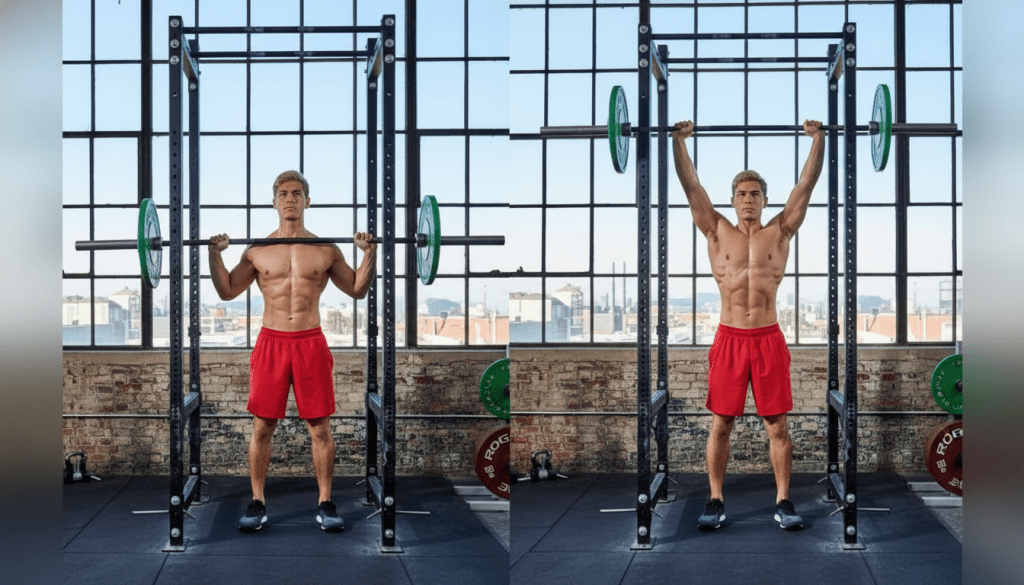
We want to have them press up the rack as close to the model as possible and make the numbers keep climbing. So, we really want people to be able to press like it shows in the blue book to get the bar to step back press over head. Some people can’t. When someone can’t do that because of shoulders arthritis, surgeries and such, another option is to press the bar up the rack and bring it back down. Coach Carmen Phillips has several clients that do this.
Sometimes you will set the pin at like throat height, sometimes nose, sometimes forehead… It just depends on how the shoulders are talking to you that day. That’s what Carmen does for herself even. What she’ll have the client do is walk up to the bar like you normally would. Put their hands on the edge of the knurl or even their middle fingers. It depends on how large the person is. Walk up and usually the toes over the line works. We have to make sure that they also have their elbows under the bar because they’re going to press this straight up. They’re not going to push against the rack. They’re going to push straight up the rack. We have a pin on the wall that gives them something to look at. Do the same cues:
- They’re going to take a great big breath. The elbows under the bar.
- They’re going to push the bar straight up the rack.
- They’re going to bring the bar back down.
- Another big breath.
- Use their hips.
- Press the bar up the rack.
- Bring the bar back down.
You’re going to walk up towards the bar. You’re going to put your hands where you normally would on (middle finger edge of the knurl). Walk up just a little bit further. Your toes are over the line. Your elbows are going to be under the bar. Now, you’re going to press the bar straight up the rack. This is why your elbows are going to be under the bar, because if your elbows were down, you’re going to push into the rack. We’re not pushing into it. We’re pushing up it. Eyes on that blue pen. You´re going to take a great big breath. You’re going to use your hips. Press straight up from underneath it. Slide it back down. Elbows under the bar. Big breath. Push up. Bring down. Elbows and breath. You want a full lock out if you can. If you can’t, because some of us can’t, that’s fine.
Of course, we want everyone to be able to press like the model in the blue book. Sometimes we just can’t because of issues (arthritis, injuries and such), but this is a good way to get your presses in when you can’t. There are other options also, but this is a really good one. So give it a try. Sometimes it’s even with a lighter bar. I hope this helps.
* If you don´t know how to do the press by the Starting Strength methodology, click here. You’ll find the information in the section for this lift in that article.
Bibliographic references:
- Rippetoe M. (2011). Starting Strength: Basic Barbell Training, 3rd Edition. The Aasgaard Company.
- Starting Strength. (2026). How to Press Against the Rack [Video file]. YouTube. https://youtu.be/1SDCvWlousI?si=Jh_WAfLqcxmXT5IB

Leave a comment