
Horacio Anselmi is a prominent Argentine physical trainer and high-performance coach with over four decades of experience in national and international sports. Below, I’ll show you the system he designed for training plyometrics in a structured and organized manner, with the goal of developing and improving the reactive force of any athlete. At the end, you’ll find the pros and cons I consider the Anselmi´s method has.
A little history
The great Soviet coach Yuri Verkhoshansky designed a training strategy because he realized the existence of reactive strength and that it could be improved by a very significant percentage. Reactive strength manifests itself precisely at the moment of imbalance, is highly specific, and has a high rate of neurological utilization. Carmelo Bosco later made his contribution by helping to measure the work through an evaluation so that it could then be redirected. There were interesting contributions from some Germans, and some things were added and subtracted. Biomechanist Vladimir Zatsiorsky also made his contributions, including naming it “plyometrics.” But those who got the most out of plyometrics were the Cubans, demonstrating that they are the kings of the practical part. This is how they developed athletes like Javier Sotomayor (high jump), Marino Drake (high jump), Iván Pedroso (long jump), Mireya Luis (volleyball), and Lázaro Borrell (basketball).
PLYOMETRICS LEVEL 0
This is the initial adaptation phase for plyometric training. It’s primarily practiced before the hormonal surge, at age 12. The drills are performed barefoot.
- Drills:
- Pogo jumps back and forth
- Single leg pogo jumps back and forth
- Single leg pogo jumps to the right and left
- Single leg pogo jumps back and forth in a zigzag pattern around a line
- Quick hop back and forth around a line
- Quick hop from side to side around a line
- Reps: Do each drill until your calves are exhausted from acid buildup, then stop and switch legs.
- Session duration: 10-12 minutes.
- Frequency: Daily, after training.
- Duration of the mesocycle: 6 months.
- Aim:
- Familiarize yourself with the muscles of the foot, which are the ones that will direct the movement.
- Strengthen joint structures. It is sought that in the joint replacement the bone trabeculae are positioned in a differentiated manner, organized to withstand continuous pressure from specific orientations.
- Increase foot strength.
The goals of Level 0 plyometrics are justified because current generations have much weaker feet than previous generations. This is primarily due to the quality of their shoes. After six months of daily practice, athletes will notice a widening of the ankles and knees, and hypertrophy of the calves. Level 0 can also be performed as ankle rehabilitation work, doing so even on changing and oscillating surfaces.
Level 0 plyometrics, as proposed by Horacio Anselmi, is a training program for conditioning the feet and ankles so they can transform and withstand the load for subsequent, increasingly demanding plyometric levels. It is not a training program for improving explosiveness, as muscle fatigue is reached without full recovery, and it becomes a training program for muscular endurance.
This level can also be done with an explosive approach, as I did when I trained it. To do this, simply don’t exceed 10 seconds in each set, which is when phosphocreatine stores are depleted and lactic acid begins to accumulate. It’s also important to rest for at least 1 or 2 minutes between drills to fully recover. For hopping drills, you can hop with the other foot immediately after finishing the first, and then rest to recover before doing the next drill. Ideally, it’s preferable to do these drills barefoot on a hard, smooth surface. It can also be done as rehabilitation training after recovering from an injury, or as maintenance training if you don’t want to overload your joints too much.
PLYOMETRICS LEVEL 1
Level 1 plyometrics and some of the Level 2 plyometrics can be performed without lifting weights. If you lift weights, the results are spectacular. If you don’t lift weights, it’s also effective. Therefore, the myth that you can’t do plyometric work if you don’t have a starting strength level isn’t true. The starting strength level is already built in; otherwise, you wouldn’t be able to perform these drills. Those authors who commented on the need for strength to do plyometrics refer to levels 3 and 4.
- Profile:
- Athletes with low levels of reactive strength (difference less than 10% between CMJ* and SJ*).
- Athletes with relatively low SJ levels.
- Athletes of good level but high body weight.
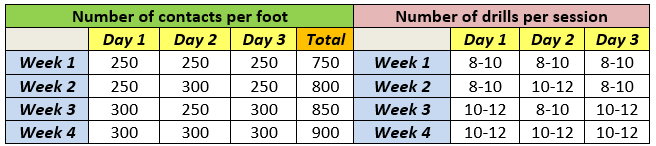
- Reps: 8-10 hops per foot.
- Drills: 8-15.
- Sets: Do not exceed 3 in each drill to avoid generating overload patterns that can lead to joint pain.
- Rest: Minimum 30 to 120 seconds.
- Frequency: 3 weekly sessions on non-consecutive days.
- Duration of the mesocycle: 4 weeks.
- Aim: Strengthen your feet in all possible directions.
* SJ: Squat jump. CMJ: Countermovement jump. DJ: Drop jump.

As you can see, the number of jumps is high. Despite this, for an athlete coming from a beginner’s phase, they aren’t too many, and they won’t get injured. American Paul Check studied overload patterns and concluded that overuse injuries always occur whenever the same mechanics are used. To the extent that the mechanics of execution occur through the same channels, injury is imminent. This is why training machines force you to repeat the movement pattern always in the same place, while the reps of work done with free weights are never the same. A lifter always moves the bar in a slightly different place.
Day 1: Single-leg Jumps
- Equipment: Rope, agility ladder and quadrilateral.
- Aim:
- Purity of execution
- Coordination
- Short contact time
With creativity and imagination, countless drills can be designed using a rope, an agility ladder, or a quadrilateral. What changes compared to Level 0 is that, in the case of the agility ladder and the quadrilateral, the size of the square means more distance is required. Greater distance adds inertia. Inertia is a greater influence of reactive force.
As day 1 is being done, athletes begin to perform the exercises proposed with absolute suitability. But we, as coaches or physical trainers, continue to make things more complicated and difficult by designing endless drills to make tasks challenging and able to be performed with minimal contact with the ground in multiple directions. The interesting thing is how the brain immediately grasps, summarizes, and improves, and by repeating the drills the following week, it becomes much better, and even better in subsequent weeks. Therefore, it’s also interesting to change the drills to provide a new challenge for the brain.

Day 2: Prisoners
- Equipment: Jump boxes measuring 40 x 90 x 10 cm and 40 x 90 x 20 cm.
- Aim: Begin to propose different angles for working on jumping, seeking to exercise reactive force at these angles.
For the lunge/split position on prisoner or platform positions, the front foot is flat on the sole of the foot and turned slightly inward so that the knee doesn’t move too far forward. The back foot is supported only on the ball of the foot. The knee of the back leg is tucked slightly inward, and the ankle points outward to keep the hip straight. Place your hands on your waist.
With the prisoners, a muscularity situation is added that forces the exercise of reactive strength from a lunge position. The body is forced to align so that the exercises are performed at the programmed angle. From there, the possibilities and situations of this position begin to change: an upward angle is added, taking off from the ground and going into the lunge position, laterally from the ground to go into the lunge position and back… With all this, the brain and muscles are being trained to be precise, punctual, and explosive.

Day 3: Choreographic
- Equipment: 3 jumping boxes measuring 40 x 90 x 10 cm or 40 cm high hurdles, one jumping box measuring 40 x 90 x 40 cm and hurdles with sticks.
- Aim: Proceed to perform different sequences of jumps with two feet with a marked coordinating effect and with the appearance for the first time at this level of training of the intensity of a drop from 40 cm, which corresponds to the height of this device.
This is the first day where some intensity begins. On day 3, choreographies begin to be built with different possibilities and positions. The goal is to perform 10 jumps that are always different (twists, outward jumps, lateral jumps, etc.) and that pose a neurological complication as a challenge. When hitting the ground with each jump, a single, precise thud must be heard.
Upon completing Level 1 and evaluating the athletes, we find the following: If Level 1 was completed without lifting weights, the SJ improves significantly and reactive force improves by 20%. Even so, there may be problems with jump execution due to excess weight, especially in women. As long as an individual maintains their appropriate body weight, jumps are fluid. Another issue to consider is symmetry, as women have a greater tendency to have outward-rotated knees. This is due to imbalances in initial training and is corrected with weightlifting and stretching drills for the fascia lata tendon.
PLYOMETRICS LEVEL 2
After completing Level 1 and evaluating the athletes, we must calculate the drop jump because Level 2 introduces the optimal drop height to further refine our training. In Level 2, the intensity of the jumps increases since we know the Q height (optimal drop height). On the other hand, the total number of jumps is reduced compared to Level 1.
- Profile:
- Athletes who completed the 4 weeks of Level 1 effectively, in a coordinated manner, and with short contact times.
- Athletes who possess a high level of initial strength and reactive force that is optimally expressed with drops of 40 cm or more.
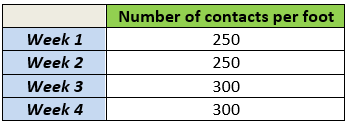
- Reps: 8-10 hops per foot.
- Drills: 8-12.
- Sets: Do not exceed 3 in each drill to avoid generating overload patterns that can lead to joint pain.
- Rest: Minimum 2 to 3 minutes.
- Frequency: 3 weekly sessions on non-consecutive days.
- Duration of the mesocycle: 4 weeks.
- Aim:
- A significant increase in the evaluation of the countermovement jump.
- An increase in jumping without countermovement, much greater if we are working with weights.
- A small increase in the optimal drop height of the depth jump.
Day 1: Angular Variations
- Equipment: Rope, agility ladder and quadrilateral.
- Aim: The athlete must jump and land with three different knee joint angles:
- 170° (almost extended, normal)
- 90° (semi-squat)
- 40° (full squat)
On day 1, the variation in the working angles of jumpability appears. Using the same materials as on day 1 of level 1, jumps will be combined at three different angles: standing, half-bent, and squat. The aim is to accustom the athlete to the fact that he can be reactive in each of these positions. Generally, after a month of prisoner training (level 1), the legs have a certain stability to land in different situations.
Day 2: Frogs/Lateralization
- Equipment: Jumping boxes of 40 x 90 x 10 cm and 40 x 90 x 20 cm, 40 cm hurdles.
- Aim: Laterality training is implemented in reactive force. Varying different ways of performing jumps with different landings and takeoffs.

When landing, it is important to place only the forefoot on the ground and to only hear a single tap with both feet, indicating that you are landing on both feet at the same time. One of the most important details to achieve with plyometric work is a unitary and extremely short contact time.
Day 3: Q Height
- Equipment: Jumping boxes of 40 x 90 x 10 cm and 40 x 90 x 20 cm, 40 cm hurdles.
- Aim: Intensity emerges. Athletes will begin to experience what it means to land and jump from their optimal landing height for reactive force training. Reactive force is now being pushed to its true limits. We will work strongly and directly on reactive force, achieving the optimal landing height whenever possible.

On the third day, the goal is to work strongly and directly on reactive strength, achieving the optimal landing height for each athlete, both on both bipodal and unipodal, whenever possible. This day’s exercises are designed to meet the maximum demands of each athlete, and the goal is to ensure that contact with the ground is as optimal as possible. It’s important to keep your back straight and well-armed.
Always try to land with your foot in the same place. This same rule from level 0 continues to apply to all levels.
An interesting drill that can be done on day 3 of level 2 is the tower jump, especially for those who play volleyball, handball, or basketball. It involves developing a certain speed of movement, jumping with both feet and landing on top of the tower.
By the end of Level 2, all the different strength angles have been worked on. In addition, the legs can be launched and abruptly moved from all angles, from the front, to all sides… If the objectives of levels 1 and 2 are achieved within 8 weeks, the athlete has an unusual reaction and reactivity. Jumps of 40 cm or more are typically achieved. If you have also trained in weight training, you can achieve jumps of 55 or 60 cm.
PLYOMETRICS LEVEL 3
- Profile: Level 3 is characterized by the fact that most jumps have the optimal landing height for depth jump. Level 3 is not recommended for athletes who do not strength train at least twice a week. This is not only for impact prevention, but also because as reactive force is optimized, overall improvement increasingly depends on initial strength levels.
- Reps: 8-10 jumps per foot.
- Drills: 10-16.
- Sets: Do not exceed 3 in each drill to avoid generating overload patterns that can lead to joint pain.
- Rest: Minimum 3 to 5 minutes.
- Frequency: Given the intensity of the stimuli, the number of stimuli is reduced to 2 weekly sessions on non-consecutive days.
- Duration of the mesocycle: 4 weeks.
- Aim: All jumps are of Q height. Essentially, both days are similar. Circuits appear that encompass the characteristics of the sport with initial hurdles placed at the optimal height.
If the athlete doesn’t lift weights, the problem of structural solidity will arise at level 3. Structural solidity requires tension time, and plyometrics don’t provide that. Ground contact times during landing and takeoff are below 200 milliseconds. Therefore, bone structures don’t have time to solidify. This problem doesn’t occur if we lift weights while simultaneously training plyometrics.
If we don’t lift weights, we must use one of the two weekly days of Level 3 to perform jumps on other types of surfaces, such as a mat, grass, or sand. The objective of this is almost anachronistic: to increase contact time. This is done therapeutically for individuals who don’t lift weights. This adds contact time, which provides structural solidity. The types of drills performed on this special day, with work on other types of surfaces, correspond to those of Levels 1 and 2.
If we lift weights, we’ll work both days on a hard surface, performing all jumps from the Q height. Generally, at level 3, the jumps are almost always single-leg jumps because we’re not interested in hitting the ground from a height of 1.10 meters, for example. So we use the individual Q height of each foot, which would be between 30 and 40 cm, and we’ll try to equalize the value for both feet.
Después de la cuarta semana del nivel 3 se habrá mejorado el índice de fuerza reactiva, el cual se acercará al 25%. También mejoramos a partir de la mejoría de la fuerza. El número de sesiones baja a dos días porque ya no hay más posibilidades de seguir mejorando la fuerza reactiva. Lo que pretendemos es mantener la idoneidad que ya tenemos mientras incrementamos nuestros niveles de fuerza.
After the fourth week of Level 3, the reactive force index will have improved, approaching 25%. We also improve based on the improvement in strength. The number of sessions drops to two days because there is no longer any opportunity to continue improving reactive force . Our goal is to maintain the fitness we already have while increasing our strength levels.
PLYOMETRICS LEVEL 4
- Profile: Athletes above level 3 generally have excessively high optimal landing heights. A fall height of around 80 cm is not only uncomfortable, but also somewhat dangerous. The solution is to place a weighted vest so that the load is very close to the athlete’s center of mass, and the evaluation of each leg in isolation, proposing the performance of level 1 and 2 drills exclusively with each foot.
- Reps: 8-10 hops per foot.
- Drills: 10-14.
- Sets: Do not exceed 3 in each exercise to avoid generating overload patterns that can lead to joint pain.
- Rest: Minimum 5 to 8 minutes.
- Frequency: Given the intensity of the stimuli, the number of stimuli is reduced to 2 weekly sessions on non-consecutive days.
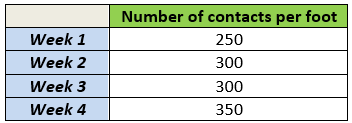
- Number of contacts per foot: 300-350 each session.
At level 4, harnesses with elastic bands and overload vests are introduced as accessories for use during jumps. This level is intended for high-performance athletes.
My personal opinion on Anselmi’s plyometrics
Personally, I decided to do this training several years ago, eventually completing Level 3. Taking advantage of the fact that I had much more free time during the summer holidays, I completed levels 1, 2, and 3, having already completed level 0 in the previous winter and spring months. Learning about and experiencing this form of plyometric training, as well as the methodologies of other coaches such as Yuri Verkhoshanky (the father of plyometrics), Michael Yessis, and Kelly Baggett, has allowed me to develop a very enriching perspective on this topic.
In general, the types of drills Horacio Anselmi incorporates into his system can be perfectly valid for any sport, although some have a greater focus on situational sports*. These situational sports-specific drills wouldn’t be necessary if you practice sports like track and field or gymnastics, but they’re not a bad idea if you want to find ways to vary the stimulus.
* Situational sports are those that require participants to make decisions and adapt to changing and unpredictable circumstances during the activity (soccer, basketball, volleyball, tennis, martial arts, fencing…).
The positive aspect of Anselmi’s plyometric method is that, in addition to being organized and structured by levels, he justifies the reason for this organization by defining the number of sets and reps to perform in each drill, as well as the variety of drills. However, while I agree with most of his point of view, I also find some flaws that, due to the fact that I myself have followed this program, and when compared to the results I’ve obtained by working plyometrics in other ways, strongly supports my criticism of some of the details.
The main flaw is that the volume of each session — that is, both the number of drills and the total number of ground contacts — is excessive. High volume causes fatigue in the central nervous system and this impacts performance because it ceases to be a quality workout, even if rest is complete. It is true that with low intensity plyometric drills (levels 1 and 2) a higher work volume can be tolerated than with high intensity plyometric drills (levels 3 and 4). However, I consider the number of jumps to be excessive for all levels except level 0. When I currently train myself in my plyometric sessions performing high-intensity drills, two drills in this category are enough for me. I always start warming up by doing a sets of no more than 15 pogo jumps, and after 3 minutes I begin the two main drills, resting for at least 5 minutes between sets and no more than 10 minutes so as not to lose the effects of the warm-up, especially when it’s cold. Of the two drills I do, the second is always the drop jump or a variation of it. The difference from what I did before is that now I get a higher-quality workout that lasts less time, and the results are reflected in greater performance, achieving the desired effects with an improvement in reactive force. My current approach to plyometric programming is much more influenced by Kelly Baggett, although I incorporate details from different authors.
Another criticism I have, although less significant, is that with some exercises a fourth set could be tolerated, that is, one more set in addition to the total number of sets that Anselmi recommends. This is especially possible for low-intensity drills, and for those high-intensity drills whose number of reps per set is low, considering the limit of 10 reps that Yuri Verkhoshansky recommends never exceeding. For example, instead of jumping hurdles in 3 sets of 8 reps, it’s also possible to do 4 sets of 6 reps, with the total number of jumps remaining the same. For very basic, low-intensity drills like pogo jumps, it’s possible to tolerate a maximum of 15 reps in a set.
Regarding training density, that is, the number of sessions per week, I completely agree with Anselmi, and it’s the same advice other coaches give. For low-intensity drills, you could do a maximum of three sessions per week on alternate days, and for high-intensity drills, a maximum of two sessions. With the so-called level 0, you can do it absolutely every day if the focus is on strengthening your feet and joints; but if you focus on power, you could do it every day or almost every day, since the volume is low and pogo jumps are the most basic plyometric drill there is.
Bibliographic references:
- H. Ariel B. (2016). Seminario pliometria – Anselmi – Parte 1 [Video file]. YouTube. https://youtu.be/lms_p_FQ7rs?si=8EKQSkyZye-ZcDe2
- pablo94electrotecnia. (2013). PLIOMETRIA ANSELMI VOL 2 [Video file]. YouTube. https://youtu.be/VM8TYFL3sDo?si=tyTY-RGDPPPbCVbK

Leave a comment